
Developer Onboarding: StripeOctober 16th, 2016Cristiano Betta13 minute read
This is the third in a series of articles focussing on reviewing Developer Onboarding. In this post I'm looking at the brand new design and onboarding offered by Stripe.
Criteria
I will be looking at 3 aspects of the developer onboarding experience:
- Exploration: Does the experience help me to understand or try out their product before signing up for an account?
- Onboarding & Integration: How well does the product guide me from their main site to create an account and to make that first API call or integration?
- Reference: Once I have my first integration in place, how hard is it to find the full reference documentation for the API call I made?
Stripe
The new standard in online payments

Stripe is an American technology company, operating in over 25 countries, that allows both private individuals and businesses to accept payments over the Internet - Wikipedia
Stripe is one of the companies most famous for having an excellent Developer Experience. Their reputation as a "developer first" company is well established.
Exploration
My first step is to learn what Stripe is, does, and how I can use it in my project. Let's visit their main site.

There's not a lot to be seen here for developers but there's a big developers link at the top. Before I click on it I decide to scroll down and see what else they have on their frontpage.

At the bottom of the page we find a few code snippets showing off how easy it is to integrate Stripe as a developer. They proudly state to be "Developers First" and I believe them. My only nag would be that none of this code can be run as-is, and it's limited to Javascript.

I scroll back up and click on the Developers link. I'm surprised to find a dropdown with documentation and getting started links, rather than to be brought to a general overview. This is not a bad thing, just different than what I've seen before.
It's a bit too early to deep dive into the docs so instead I take my chances with the big green Explore the stack button.
https://stripe.com/us/payments

This doesn't really inspire me any further as a developer either. I want to see some live examples but so far all I've found is marketing material and some non functional code. Let's head over to the docs.

My doubt about the docs prove to be incorrect, they are exactly what I needed. Some companies use their documentation just to focus on in-depth examples and reference documentation. Stripe on the other hand uses it to for exploration as well.
This page does a few things very well:
- Explain to me what products Stripe offers: payments, subscriptions, and more.
- Provide a way for me to try out how easy their APIs are.
I scroll down a bit to try their playground example.

This playground is a great example of learning by trying. By following the step-by-step guide a developer can get familiar with the number of API calls needed, the various parts that make up a complete payment (create token, create customer, make a charge, etc), and it even shows them features they might not have realized existed (subscriptions).
What's important to realize is that this example is not about teaching a developer what code to write but rather it's about teaching them what it takes to process a payment through code examples.
Here's the first part of this playground in action.

I follow all the steps and learn the basics of processing payments. When I reach the last step I am presented with some options as to where to go next.
")
I think I've seen enough though, let's sign up and start processing my first payment.
Onboarding
Annoyingly Stripe does not have a big Sign Up button on this page, which is rather odd. Instead I just follow the Sign In link on the top right and wish for the best.
https://dashboard.stripe.com/login

As I expected there's a link at the bottom to bring me to the sign up form.
https://dashboard.stripe.com/register

I only noticed later on that there's a link to save your account later and continue with a sort of guest-account. This is a great way to lower the barrier to entry for people not quite yet committed to signing up.
I fill in my details.
")
My password for this account is apparently a bit insecure but I continue anyway.

After signing up I am welcomed to Stripe with a popup that links to 4 separate articles covering the various steps of processing a payment.
I'm slightly disappointed that I am sent away from this page to the docs - rather than being provided with some basic steps I need to take next. Pusher handles this on the dashboard, in context of where I am in my learning process. I assume this has to do with Stripe being a more complex product with more integration options..
It's doubtful though how useful Billing your users periodically is to someone who hasn't mastered Collecting your customer's cards yet. This content could be provided more in-context, in a just-in-time way when the user really needs to know the next step in their personal learning process. In essence these links are the 4 items that one needs to learn in order to process payments and subscriptions.
Integration
I click on the first link named Collecting your customer's cards.

This page feels a bit underwhelming. It states in tiny letters that this is the first step to taking payments but it's not providing any clear next places to go. I needed to read the text precisely to discover that the Checkout link would probably be the easiest method available to me.
On the one hand this page got me where I needed to go but the way it did was not great. It did not give me much confidence that I chose the right thing: as someone new to the platform (and new to payments) its hard to tell if I needed Checkout or Stripe.js. I also had no idea what the payment process I experienced earlier in the Try now section represented. Which integration was that?
An easy way to improve this page would have been to list the differences between the two Web options in a more visual way, maybe a table, maybe a list with checkmarks. Adding some big buttons instead of links would have made it clearer that this is an important decision, not just a link to "some more documentation".
https://stripe.com/docs/checkout/tutorial

This page is extremely interesting to me. The UI element that screamed out the most to me amongst the vastness of bland text was the big blue Pay with Card button. I clicked it almost immediately.

Now this is cool, an interactive demo. I can play around with it, fill in some fake details and see what the integration would effectively look like on my site.
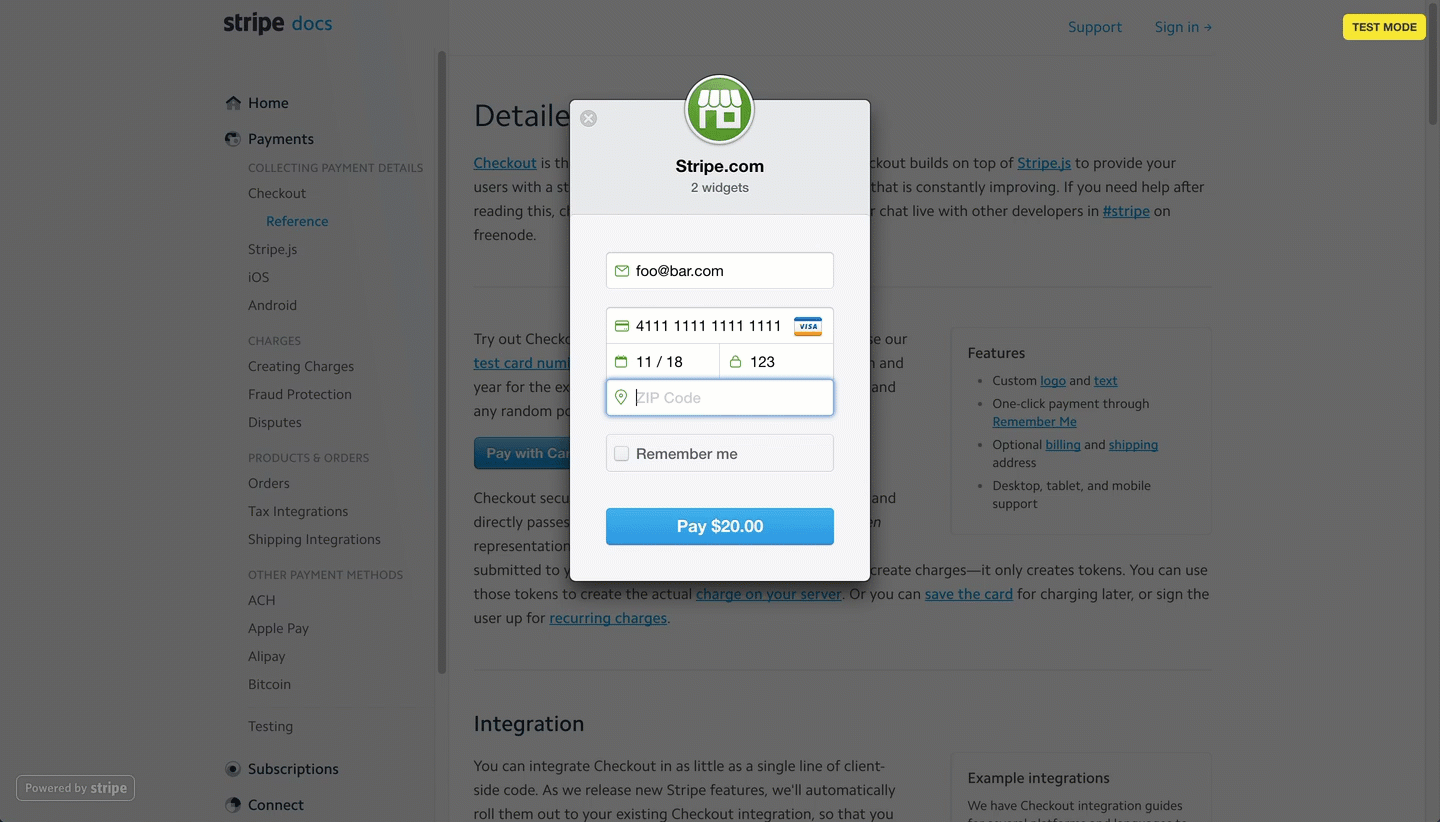
I love this demo as it gave me a good idea as to what we will be achieving next but a few things come to mind.
First off I would have loved to have been shown this and a comparison to Stripe.js earlier in the flow. What's the difference in look and feel between the two? How much can be customized?
I also noticed that once the popup is in place I can't see the instructions on what to fill in anymore. I have to close the popup, read the instructions, and try again.

As I scroll down further I find a code sample. I copy and paste it into a .html file and start up a local server.

Cool, I now have the same button as I had before but on my site! One of the cool things here is that the code I just copied had my API key inserted into it already. In other words: this code was ready to go for me the moment I signed up.

The button directly works and has all the fluid animations I saw on the Stripe documentation page. When I submit the form I end up being redirected to a page that does not exist on my server. I assume I need to continue on to the next step so I return to the docs.

What's interesting here is that there's more than one next step. The way a payment has to be processed totally depends per merchant. Stripe presented me with a tutorial on collecting card details first, rather than forcing me earlier to have to chose what flow I wanted to go through.
I click on Charging the customer immediately.
https://stripe.com/docs/charges

On this page I find the Ruby code needed to process the payment. Although the Ruby code is short and to the point it makes a few assumptions:
- The code assumes I know how to find and install the Ruby SDK
- The code assumes I know how to integrate it into a web framework
- The code assumes that I know that the Checkout code from the previous step pointed to the
/your-server-side-codepath and I know how to customise that to my liking
I was able to figure out what I needed quite easy, but a more junior developer might struggle at this point. Stripe does provide some samples for Rails and Sinatra but they're not linked to from this page.
When I start my server and run the complete code sample I got an error but when I log back into the dashboard I see that my payment has gone through!

I assume the error was my fault and continue.
Reference
After some debugging I notice the payment returns a Stripe::Charge object and I want to know what to expect of this object.

Stripe has pretty much set the standard for reference documentation in the last few years. Many other platforms have adopted the same three column layout with code samples in various languages.
I switch the reference documentation to Ruby.

On the left I find links to an Introduction for those new to the platform, popular Topics that go more in-depth in more important aspects, and a list of Core Resources.
I click on the Charges link under the Core Resources and find exactly what I needed.
")
Finally I want to take a quick look at what errors to expect and click on Errors under Topics.
")
The Stripe reference documentation is everything you'd expect it to be: complete, correct, and full of context. Resources are linked to when mentioned from other resources, errors are linked to when needed, and all of it is presented in the context of the language of my preference.
Emails
I want to quickly highlight the email that Stripe sent me while I signed up. The email did not block me from signing up but it nicely rounds out the onboarding experience.

As you can see this email serves both as a confirmation email for my email address and to provide me with links to the documentation and more.
I almost missed the confirmation link actually as it's not styled in any way. There's not much telling me that this link is more important than the others.
The other links point to the documentation and a support article on how to get started with Stripe if you're not a developer.
https://support.stripe.com/questions/using-stripe-without-programming

Conclusions
★★★★
Almost flawless
Stripe is an example of a developer product that has to teach developers what the product does at the same time as it teaches them how to use it. Additionally they have to to solve the problem of onboarding a developer in not just one but two programming languages! Stripe's first-use experience is not perfect but still pretty straightforward.
The good
- Excellent visual exploration options, allowing me to try out various UI flows without even signing up
- Excellent technical exploration options, allowing me to see all the API calls required to do the most common actions without signing up
- A sandbox account allowing me to try out their product before paying
- It took 0 clicks to get to a first code sample, as there's one right on the homepage
- The gold standard in reference documentation
The bad
- Even though Stripe claims to be "for developers" almost all developer oriented documentation is only to be found on the documentation. It's hard to find a code sample or an interactive demo outside of the docs.
- The developer documentation seems to be missing a Sign up button, suggesting it's not the developers who tend to sign up but other parts of the company.
- After onboarding a developer is provided with a few links to the documentation that should probably be followed in order. Setting up a subscription is really not useful until I know how to collect card details first. These tutorials should form a logical 1-2-3 of steps to proceed through but instead they are presented in a very disconnected arbitrary fashion.
- The email confirmation link is easy to miss due to it being presented in the same email as the links to the documentation.
Next
That's it for this third post on Developer Onboarding. Let me know in the comments below what you think of this post and if I should continue. I'd also love to know what company you think I should review next.